Nov 27, 2011

Amazing Dinner Rolls


So I was in charge of bringing the rolls to our Thanksgiving dinner. Truth be told... I have only made rolls from scratch maybe three times - EVER! The times I have made them they haven't really turned out. Not sure if it was the recipe or me? So making rolls for a crowd at Thanksgiving was a bit intimidating. Luckily, I came across this amazing recipe. These rolls were light, fluffy and buttery! And they will probably be making a weekly appearance at our table! I doubled the recipe and it came out great with 36 beautiful rolls. The original recipe used a bread machine, which I didn't have- so I changed it up to make it work without.

Sweet Dinner Rolls 
(slightly adapted from allrecipes.com)


1/2 cup warm water
1/2 cup warm milk
1 egg
1/3 cup butter, softened
1/3 cup white sugar
1 teaspoon salt
3 3/4 cups all-purpose flour
1 (0.25 ounce) package active dry yeast
1/4 cup butter, softened

Pour warm milk and water into a bowl, add sugar to dissolve, then add yeast. Allow to proof for about 20 minutes until creamy foam appears. Add 1/3 cup butter and salt, mix. Add egg, mix to combine. Add flour a cup at a time, after each cup mix with a hand held mixer (I'm sure a Kitchen Aid mixer would work just as well but we our resources are limited here). Knead for a good 10 minutes. Allow to rise for 45 minutes in a warm area, covered.

Turn dough out onto a lightly floured surface. Divide dough in half. Roll each half into a 12 inch circle, spread 1/4 cup softed butter over entire round. Cut each circle into 8 wedges. Roll wedges starting at wide end; roll gently but tightly. Place point side down on ungreased cookie sheet. Cover and put them in a warm place, let rise 1 hour. Meanwhile, preheat oven to 400 degrees.

Bake in preheated oven for 10-15 minutes or until golden. Take rolls out and rub butter over hot rolls.

Enjoy!
Pin It!

Nov 17, 2011

Turkey Cookies!

Turkey Day is coming up! I actually came up with this idea last year as I was in charge of bringing the treat for Crew's Thanksgiving preschool party. It ended up that I procrastinated (typical of me) and was left to come up with something that I already had or could find at the only grocery store where we were living. I found a lot of cute ideas using candy corns, but wouldn't you know they were out of them at the store. So I was forced to come up with my own turkey treat, using what I had. Luckily I made something work!


What you need:

BODY: Fudge Stripped Cookies
HEAD: Mini Chips Ahoy (I actually couldn't find these either, so I used a small round cookie cutter and cut out a small circle out of each cookie)
FEATHERS: Pretzel sticks
BEAK: Pepperidge Farm Gold fish
WADDLE: Twizzler Pull and Peel, cut into small pieces
EYES: Mini Chocolat chips
Chocolate Frosting to glue it all together.

Happy Turkey Day!
Pin It!

Spooky Eats!

Last year, I was in charge of bringing the Halloween snack for Crew's preschool party. On the menu: Mummie Dogs, Oreo Spiders, and Jack-O-Veggies! Super easy to throw together and the kiddos loved it! 


Mummie Dogs: Used recipe from here.

Oreo Spiders:
Oreos (Body)
M&Ms (Eyes)
Twizzler Pull and Peel, cut into 2 inch pieces (for the legs)
Chocolate frosting (to glue on the eyes)

Jack-O-Veggies:
I found the cute little pumpkin holders at Target. And then filled them with Apple slices and carrot sticks!
Pin It!

Sep 29, 2011

Ice Cream Parlour Party

I have been going through withdrawls because I have not thrown a good party for months. I came across this lovely little number from Eat, Drink, Chic. I am in Heaven! She came up with some fabulous ideas and goes over the top with tons of free printables to embellish your party! I get giddy just thinking about throwing something like this! 

{Pictures courtesy of Eat, Drink, Chic}


Love, love, love the look.


Coconut Ice Sauce?!!!... I might have to attempt to create something as divine as this! What an amazing idea for a sundae bar. 


I love how creative she was in using a wooden office organizer for the toppings! Genius!


Those printables are to die for!


She even has printables for the cups too! 


 Well, at least I know what party I will be throwing next! 
Pin It!

Sep 23, 2011

Stuffed Pizza Crust


Tonight I had planned to make pizza. It was just going to be a basic pizza, marinara, cheese, olives, pepperoni, onion... nothing special. I tried a new pizza dough recipe and since I don't have my pizza stone here in Dominica, I was left to use my cookie sheet. The recipe said it made two medium sized pizzas. It wasn't enough to half it in the pan, but when I rolled the whole thing of dough into the pan it ended up being a little too much. Since it was already in the pan, I had an idea to use the excess dough into a stuffed crust. That transformed this basic pizza into something fun and out of the norm! The garlic butter Parmesan glaze topped it off perfectly! (Thanks to the hubs for thinking of adding that goodness to it!) It was delicious and filling. I think I am going to initiate Fridays as PIZZA night. It goes so perfectly with my Friday night movie dates with Crew! 


Homemade Stuffed Crust Tutorial

Make your pizza dough according to the recipe. I used this one from Annie's Eats and substituted 2 cups of whole wheat flour. It made the perfect amount to make the stuffed crust in a cookie sheet sized pan. 

Roll out your dough and place in pan. Stretch with hands to make sure the dough is evenly distributed.  There should be an excess of about an inch of dough hanging off of the edge. 

Place a good amount of cheese around the very edge of the pan. 


 Fold over excess dough and press it down.


Make sure it is pressed down completely all the way around.

At this point you can add your sauce and toppings.

Then melt about 3 tablespoons of butter. Mix with about 1-2 teaspoons of minced garlic. Brush it onto the crust and top with a good amount of Parmesan cheese.


Ready to be baked.


Enjoy!
Pin It!

Sep 12, 2011

My New Favorite Frosting!

I have always thought powdered sugar and frosting go hand in hand. That was until I tried this new recipe. It looked kind of wierd calling for only flour, milk, vanilla, butter and sugar - regular white sugar NOT powdered sugar. I thought it seemed interesting. And so I tried it.  

Let me tell you I have a new favorite frosting! This is hands down the best frosting I have ever had! Well I have a few favorites but this is definitely in my pool of favorite frostings! I love it! It is perfectly sweet with a silky smooth texture! It doesn't have that overly sweet taste that many frostings have that use powdered sugar. You know when trying to get your frosting to that perfect consistency and you add more and more powdered sugar only to find that by the time you add enough powdered sugar, it completely ruins the flavor because it is just too sweet? Well, problem solved! And it's whipped to perfection! This is the perfect recipe. Consistency, flavor and texture... A+! It would be a lovely accent on any cake! 

I love the site that I found it on. She goes through a complete step by step guide with pictures of how to make this magical frosting. Check it out here.


The Best Whipped Frosting
makes enough to frost a 9″ layer cake or one dozen cupcakes generously
1 cup milk
5 tablespoons flour
2 teaspoons vanilla extract
1 cup butter, at room temperature
1 1/4 cups granulated sugar (not powdered sugar)
In a medium saucepan, whisk one cup of milk with 5 tablespoons of flour. Heat over medium until the mixture begins to sputter, whisking constantly. Continue to stir as the mixture thickens. You will know it’s done when it reaches the consistency of thick cake batter, after about 7 minutes of heating and whisking. Stir in 2 teaspoons vanilla extract and set aside to cool COMPLETELY.
Now, in the bowl of a stand mixer fitted with a whisk attachment, or using a hand held mixer, beat 2 sticks of softened butter (1 cup) with 1 cup of granulated sugar until light, fluffy, and white in color, about 3 solid minutes of beating on medium-high speed. You want the sugar to be totally incorporated into the butter.
Be sure that the milk/flour mixture has completely cooled, and add it to the butter/sugar mixture. Beat all ingredients for about 1 minute on high speed, scraping down the bowl halfway, until they are smooth and well blended. The frosting should be as light and fluffy as whipped cream.

Pin It!

Sep 1, 2011

Homemade Kitchen Cleaner

Here in Dominica, cleaners are super expensive (at least double what they are in the states), especially the American name brand ones. And living on a student budget doesn't give you the means to purchase a lot of extras. I ran out of my Lysol Kitchen Cleaner, that I had spent somewhere between $7- $10 USD (I think they are around $3 in the states). I went to the store to get some more and they were out of it. I was making something with chicken that night, so I knew I had to disinfect my countertops one way or another. Getting desperate, I decided to make my own. I looked in my cupboards to see what concoction I could come up with. I always have bleach on hand. And it hit me... why not make a homemade version of Clorox Cleanup? So I did. I kept my old kitchen cleaner spray bottle and mixed about 1 TBSP of bleach and 1 tsp. of dishsoap, then filled the bottle with water. Shake it up, and you have a very inexpensive/ antibacterial kitchen cleaner! Nothing kills germs better than BLEACH! I don't know why it took me so long to think of making my own. It's worked like a charm and saved us some serious cash at the same time!


Tips:

  • Be careful not to spray on your clothes, it has bleach in it.

  • After you spray, let it sit for about 30 seconds before you wipe it clean. 

Pin It!

Aug 24, 2011

My FAVORITE ... Coconut Cupcakes!!!

Broc surpised me with this book a couple of Christmases ago. It has some amazing recipes in it. Knowing that I am slightly obsessed with cookbooks and that I am on a never ending quest to find the best recipe, it was the perfect gift. I highly reccomend it! And you know any recipe by Ina Garten is going to be fabulous! 
So in this fancy little book was where I was first introduced to...


The Barefoot Contessa's COCONUT CUPCAKES!!!


Coconut cupcakes happen to be one of my favorite kinds of cupcakes! And these babies are amazing! A hands down favorite for me! The combination of the cake and the frosting together are  perfection! If you are going for the wow factor - these are the cupcakes to make! I'm telling you- a little bit of heaven in every bite! They are elegant and perfect for any party or occasion!


So I think there is one ingredient that is key to making these babies so good. It is my staple secret ingredient to baking. Let me introduce you to the best vanilla on this planet:


Nielsen-Massey Madagascar Vanilla


I never really thought that it made a difference which brand of vanilla extract I used. I thought they were all the same. That was until I tried this! This stuff will change your life. I promise. After trying this there is no way you will ever go back. You can purchase it at any specialty food store like, Williams-Sonoma, or Orson Gygi (if you live in UT). I usually purchase the huge 32 oz. bottle and it definitely gets used!

Now onto the recipe.


Coconut Cupcakes
Courtesy of The Barefoot Contessa


3/4 pound (3 sticks) unsalted butter, room temperature
2 cups sugar
5 extra-large eggs, at room temperature
1 1/2 teaspoons pure vanilla extract
1 1/2 teaspoons almond extract
3 cups flour
1 teaspoon baking powder
1/2 teaspoon baking soda
1/2 teaspoon kosher salt
1 cup buttermilk
14 oz. sweetened, shredded coconut

For the frosting:
1 pound cream cheese, at room temperature
3/4 pound (3 sticks) unsalted butter, room temperature
1 teaspoon pure vanilla extract
1/2 teaspoon pure almond extract
1 1/2 pounds confectioners' sugar, sifted

Directions:
Preheat the oven to 325 degrees. In a bowl of an electric mixer fitted with the paddle attachment, cream the butter and sugar on high speed until light and fluffy, about 5 minutes. With the mixer on low speed, add the eggs, 1 at a time, scraping down the bowl after each addition. Add the vanilla and almond extracts and mix well.

In a separate bowl, sift together the flour, baking powder, baking soda, and salt. In 3 parts, alternately add the dry ingredients and the buttermilk to the batter, beginning and ending with the dry. Mix until just combined. Fold in 7 ounces of coconut.

Line a muffin pan with paper liners. Fill each liner to the top with batter. Bake for 25 to 35 minutes, until the tops are brown and a toothpick comes out clean. Allow to cool in the pan for 15 minutes. Remove to a baking rack and cool completely.

Meanwhile, make the frosting. In the bowl of an electric mixer fitted with the paddle attachment, on low speed cream together the cream cheese, butter, and vanill and almond extracts. Add the confectioners' sugar and mix until smooth.

Frost the cupcakes and sprinkle with the remaining coconut.

Enjoy!

Pin It!

Aug 11, 2011

Paper Bag Book

One of the girls I teach at church, got baptized a few weeks ago. I wanted to give her a special gift to help her remember her special day. It is so easy in the states to go and find something nice, but living on this island you don't have the luxury of having a Deseret Book on every corner. So you have to get creative! I took the idea of my Blessing Books I have made for my boys and utilized the resources I had... and Voila! came up with the PAPER BAG BAPTISM BOOK! I know that I am probably not the first person to come up with a book from paper bags. But I have never seen one used like this before. And it felt so good to make something from items I had laying around my house and transform them into something lovely she could treasure forever.


The idea behind a book like this is to have each person who attends, write something they remember from the day/blessing, or simply write a nice note to the person. Normally for my blessing books, I have used a scrapbook with about 10 blank pages. I add a picture to each page to personalize it, and there you go- a lovely book filled with memories of their special day! I love looking at Crew's and Jack's blessing books and reading the sweet things people remembered from their blessing day- things that I would have missed or maybe even forgotten! I LOVE these books! So I used the same idea for this book!


On the first page I usually put the info from the day. If you are doing it for a blessing, you could put the name of the person giving the blessing, date, place, etc...


Paper Bag Book Tutorial:

Gather supplies:
*small brown paper bags (I used 9)
*glue stick
*hole punch
*ribbon/ raffia/ jute
*square photos- one per page about 2 to 3 inches square depending on how big you want the picture.
*photo for the front (and any additional sayings that you may want)
*info printed for inside page


1. Take one paper bag and place three verticle holes, equally spaced on the closed side of the bag.

2. Use the first bag to line up the holes for the remaining bags. Place the bag with the holes punched on top of the next bag. Use the hole punch to punch through the next bag. The holes should match up exactly.

3. When you have finished punching the holes in all of the bags, tie them together with your ribbon/ raffia or whatever you are using. I cris-crossed mine to add a little design to it. But you can make it as intricate or as simple as you desire.

4. Glue each bag closed.

5. Add pictures etc...

Voila you're done! You could use this idea to make a Father's day/ Mother's day book, birthday book (instead of cards, have people write in this small book and maybe only do a few pages) the options are endless!


Pin It!

Aug 5, 2011

Jack's BEACH BUM Party


My baby turned one on July 7. 
I decided to do a "beach bum" themed party!
 it just seemed so fitting!


Location: the BEACH of course! 
There was an old abandoned restaurant at the beach where we celebrated. It was perfect for holding the food, drinks and cake! 


We served Jack's favorite- BBQ Chicken Pizza, recipe from here. Seriously, he loves it!

Paper Straws from Orson Gygi


We also had some beach themed finger foods as well- Pepperidge Farm Goldfish and Gummy Sharks


The CAKE!
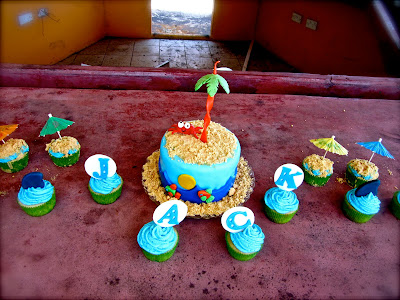
 Chocolate cake with a chocolate cream cheese frosting. My creative friend Kristen came up with the idea to turn the candle into a palm tree (genious!) and molded the palm leaves and the fish (small one is Jack and the bigger one is Crew- so cute!)  I molded Mr. Crab. There had to be a crab incorporated somewhere- those things are all over the place here and Jack totally resembles one when he runs sideways in his walker! It's hilarious! 


I made homemade vanilla cupcakes with vanilla buttercream from here, crushed up some coconut cookies for the sand and topped it with a parasol. Doesn't get much better than that!


The birthday boy himself... enjoying some presents!


The gang!


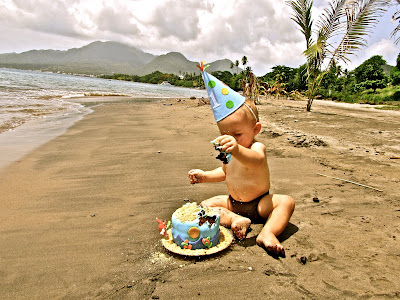
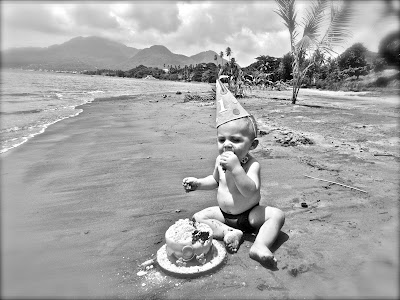
Cake time! Dig in!!


The best part... you can't tell the real sand from the fake sand!


Washing off in the ocean!


Happy Birthday my Sweet Boy!
Pin It!